The Thermal Imager is powered by an internal rechargeable battery pack, and has a built in charger that recharges the battery when connected to a power source.
A fully charged battery pack can provide up to 4 hours of continuous operation. The battery discharge rate will vary depending on overall use and settings. For example, using the LED spotlight or a high level display brightness setting will accelerate battery discharge.
To prolong the life of your battery, turn off the Thermal Imager when not in use.
The battery pack should be used within a short period of time (about 30 days) after charging to prevent loss of capacity due to self-discharging.
If the battery pack no longer holds a charge, contact your sales representative to order a new one.
The battery pack contains no user serviceable components. Tampering with the battery pack terminals or housing will void the product warranty.
Keep the following in mind when using and handling the battery pack:
| ● | Do not short circuit battery pack terminals. |
| ● | Do not immerse the Thermal Imager or battery pack in water, or allow water to enter the Thermal Imager or battery pack. |
| ● | Do not crush, disassemble, or tamper with the battery pack. |
| ● | Do not heat the battery pack to over 100°C (212°F), or dispose of it in a fire. |
| ● | Do not expose the battery pack to excessive physical shock or vibration. |
| ● | Keep the battery pack out of reach of children. |
| ● | Do not use a battery pack that appears to have suffered abuse or damage. |
| ● | Charge the battery pack using the appropriate charger only. |
| ● | Do not use a battery charger adapter that has been modified or damaged. |
| ● | Use the battery pack for the specified product only. |
| ● | Store the battery pack in a cool, dry, well ventilated area. |
Follow all safety guidelines when handling the battery pack. Read, understand and follow all safety messages and instructions in this manual, and in the Important Safety Instructions supplied with the Thermal Imager.


Risk of electric shock.
• Prior to recycling the battery pack, protect exposed terminals with heavy insulating tape to prevent shorting.
• Turn the tool off before removing the battery pack.
• Do not attempt to disassemble the battery or remove any component projecting from or protecting the battery terminals.
• Do not expose the tool or battery pack to rain, snow, or wet conditions.
• Do not short circuit the battery terminals.
Electric shock can cause injury.

Risk of explosion.
• Only use the Snap-on lithium-ion battery approved for this device. Do not use any other battery or power adapter source. Incorrect replacement, charging, or tampering with the battery pack may cause an explosion.
Explosion can cause death or serious injury.
There are three modes of charging:
| ● | Low Rate (approximate charge rate 100mA) |
| – | Thermal Imager turned on |
| – | USB cable connected to a powered PC USB jack |
| ● | Medium Rate (approximate charge rate 500mA) |
| – | Thermal Imager turned off |
| – | USB cable connected to a powered PC USB jack |
| ● | High Rate (approximate charge rate 960mA) |
| – | Thermal Imager turned off |
| – | Using supplied or compatible USB power supply adapter connected to AC power source |
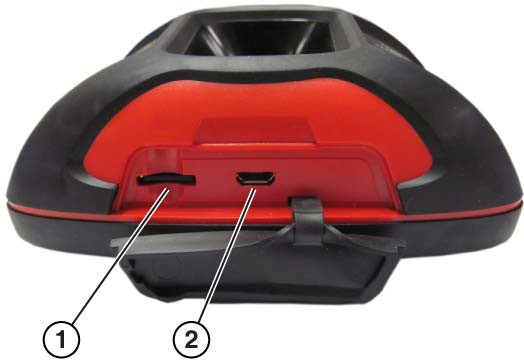
A protective cover is used over the USB jack and microSD card slot, located on top of the Imager. Always keep the protective cover closed during operation. Only open the protective cover during battery charging, or when removing the microSD card. Opening the protective cover during operation could result in an electrostatic discharge event that may cause the Thermal Imager to reset. If this occurs, the Thermal Imager will reset and return to normal operation without being damaged.
When the battery reaches a low charge level (approximately one bar indication on icon), the LED flashlight is disabled.
| 1. | Turn the LED spotlight off. |
| 2. | Open the protective cover on top of the Thermal Imager. |
| 3. | With the battery pack installed in the Thermal Imager, connect the USB cable to the micro USB jack on the Thermal Imager. |
| 1. | microSD Card |
| 2. | micro USB Jack (USB power supply connection) |
It is highly recommended to use the supplied USB power supply adapter to charge the battery. Using a non-approved power supply adapter (max. 500mA charge rate output) may result in insufficient charging.
| 4. | Connect the USB cable to the USB power supply adapter. |
| 5. | Connect the USB power supply adapter, to a live AC power source. |
The battery pack will also charge when the USB cable is connected to a PC (using the power supplied from the PCs USB connection).
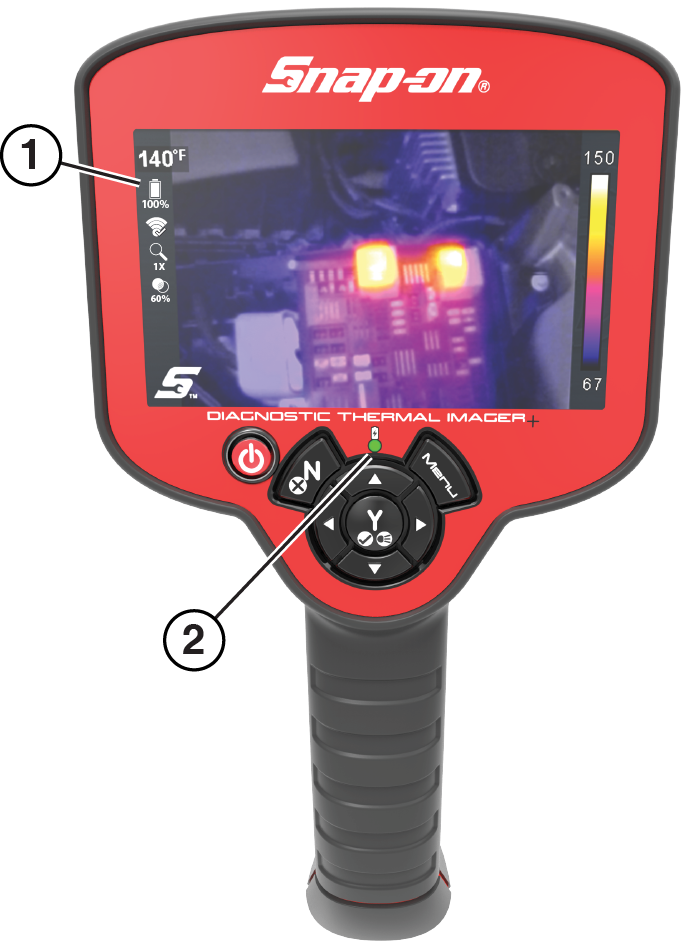
The battery charge indicator LED is located on the front of the Thermal Imager above the control buttons. A red LED is turned on to indicate the battery is being charged. A green LED indicates the battery is fully charged.
(Device on) A battery level icon is used to indicate the charge level of the battery, and when the battery is being charged.
| 6. | Close the protective cover, when finished. |
| 1. | Battery Level Icon |
| 2. | Battery Charge Indicator LED (Red-charging, Green-charged) |
|
|
Indicates power is being supplied by the internal battery pack. Horizontal bars diminish as the battery discharges. |
|
|
Indicates power is being supplied by the USB power supply adapter to charge the battery pack. |
Replace the battery pack with a Snap-on replacement battery pack only.
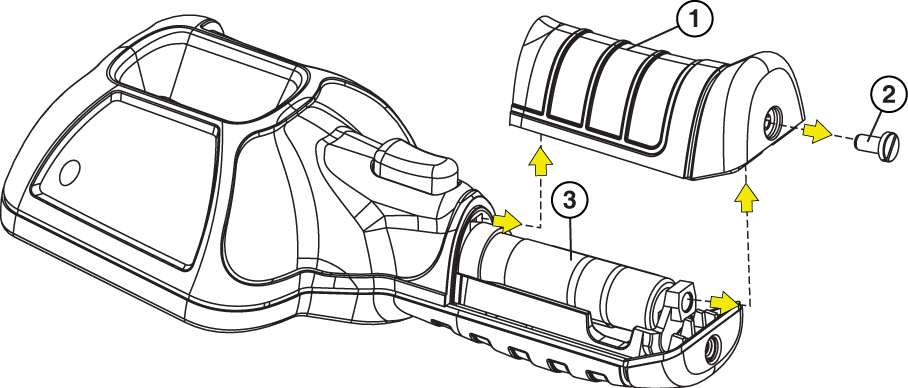
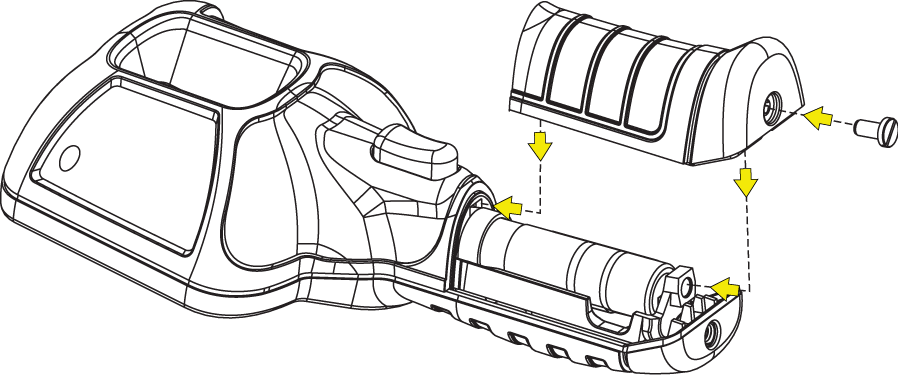
| 1. | Remove the screw at the rear of the battery pack cover, and pull the battery cover back and then up to remove. |
| 1. | Battery Pack Cover |
| 2. | Battery Pack Cover Screw |
| 3. | Battery Pack |
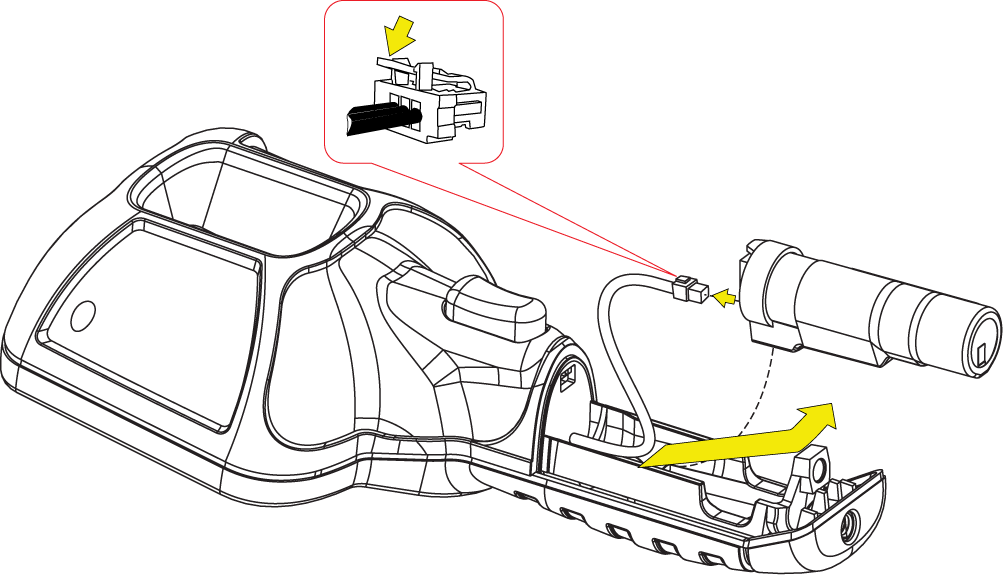
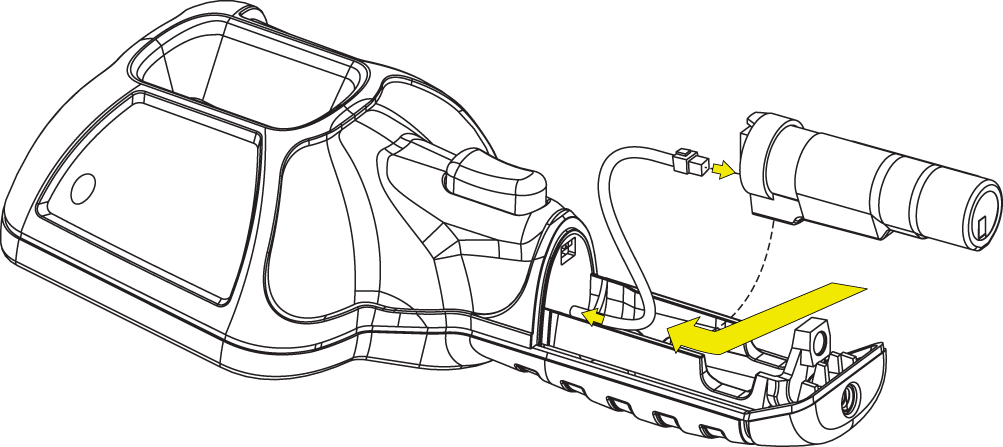
Carefully lift out the battery pack, then press down on the battery lead connector release tab and remove the connector from the battery pack.
Do not pull the battery harness out of the housing.
| 2. | Insert the battery connector into the battery pack, until it locks (clicks) into place. |
Do not force the battery pack into the Thermal Imager, it should set easily into place.
| 3. | Feed the slacked harness into housing, as you install the battery pack into the housing. |
| 4. | Install the battery cover. Press down until the locking tabs secure the cover. |
Date and time settings will need to be reset whenever the battery is reconnected after being disconnected.
Contact your sales representative to order a replacement battery.
Replace the battery pack with a Snap-on replacement battery pack only.
Always dispose of a lithium-ion battery pack according to local regulations, which vary for different countries and regions. The battery pack, while non-hazardous waste, does contain recyclable materials. If shipping is required, ship the battery pack to a recycling facility in accordance with local, national, and international regulations. For additional information in the following markets contact:
| ● | North America—Rechargeable Battery Recycling Corporation (RBRC) at http://www.rbrc.org or http://www.call2recycle.org, or call 1(800) 822-8837 (USA) |
| ● | United Kingdom—Electrical Waste Recycling Company at http://www.electricalwaste.com |
| ● | Australia - Australian Battery Recycling Initiative http://www.batteryrecycling.org.au |
| ● | New Zealand - Ministry for the Environment / WasteMinz |
Products bearing the WEEE logo are subject to European Union regulations.

Always dispose of materials according to local regulations.
Contact your sales representative for details.


